Showing posts with label ARM architecture. Show all posts

Friday, July 24, 2015

The Tooba

Way back when, one of my friends in high school was a guy named Dave Wilson whose father got him into Moog-style analog electronic music synthesizers. Dave created a museum of historical synthesizers in his home in Nashua, New Hampshire. Through my high school and college years, we exchanged ideas and circuits and bits of lore for various synthesizer hacks. These synthesizer modules were implementing mathematical functions that could be implemented in digital electronics. So we both at various points and in various contexts wrote code to do that.

The Tooba is going to be some of that built into a short length of 3" PVC tubing. There will be a two or three-octave touch sensitive keyboard and some linear slide pots for various synth parameters. Sound will be generated in the same Teensy 3.1 controller board that scans the keyboard. Unless the poor little CPU gets overwhelmed, then maybe I'll put in a second Teensy for sound generation.

Here is a prototype, mostly testing the touch-sensitive keyboard. For this version the sound was generated by Timidity running on a Raspberry Pi, and the form factor is obviously different. The keyboard misbehaved in this video because of a sagging under-powered 12-volt supply.

UPDATE: Wrong! The keyboard misbehaved because of a programming error identified much later, now corrected.

I'll add more to this post as the thing gets closer to completion.

I had some confusion about the date for the Rhode Island Mini Maker Faire (last year it was a month after the NYC Maker Faire) so I had to hustle when I got the date correct. But I managed to pull it off and have got the thing working.

I also had to figure out how to mount the copper hexagons on the PVC tubing. Eventually my technique got good enough, but by then I had a mix of well-soldered and poorly-soldered hexagons, and the latter periodically pop off. So in the video below you'll see some missing hexagons that I need to replace before I head down to Providence.

So that's the gadget. There is a lot of clean-up to do on the mechanical design. Now I feel it's stable enough to justify laying out a printed circuit board. And the inside wires should be replaced by ribbon cable. But hey, it's working.

Tuesday, April 15, 2014

Espruino: JavaScript for embedded devices

My last post was really written primarily as background for this post. TL;DR: there is a lot we're doing right nowadays as software engineers, that we were screwing up badly 20 to 30 years ago.

I am moved to write this post because I've been playing with the Espruino board (having pre-ordered one during the Kickstarter campaign), which runs JavaScript close to the metal on an ARM processor.

JavaScript is a cool language because it draws upon a lot of the experience that engineers have gained over decades. Concurrent programming is hard, so JavaScript has a bullet-proof concurrency model. Every function runs undisturbed to completion, and communication is done by shared-nothing message passing. In the browser, JavaScript gracefully handles external events with unpredictable timing. That skill set is exactly what is required for embedded hardware control.

Crockford once referred to JavaScript as "Scheme with C syntax". JavaScript has many of the features that distinguish Lisp and its derivatives, and which set apart Lisp as probably the most forward-looking language ever designed.

This video is Gordon Williams, the creator of the Espruino board, speaking at a NodeJS conference in the UK. One of the great things he did was to write code that can run on several different boards. I'm particularly interested in installing it on the STM32F4 Discovery board because it costs very little and looks pretty powerful as ARM microcontrollers go. There is a Youtube playlist that includes these videos and others relating to the Espruino board.

Friday, October 05, 2012

Blogging from a Raspberry Pi board

I've plugged an Ethernet cable into the Raspberry Pi and brought up the Midori web browser (which I had previously never heard of). As a web-browsing experience, the RPi is extremely slow, but it works. Google's new authentication scheme is a little dubious about Midori, not too surprising. But it rendered Facebook readably and I was able to look at some of my pictures on Flickr.

I intend to find some interesting hardware hack for the board, probably a musical instrument of some sort. Of course it won't be running X Windows at that point. If I get ambitious I might try to figure out how to create a stripped-down X-less Raspian distribution. I've done a little bit of distro hacking on Ubuntu in the past.

Even without X, I'm concerned about performance issues. Linux is not normally used for real-time use, but apparently I'm not the first person to wonder if that's feasible. Well I think I've exhausted my patience here.

Back on a normal computer. That was interesting, but enough is enough. Any RPi hacking that reaches a state of readiness for public consumption will be posted on Github, and notifications will appear here.

Before I forget, one handy note to other Yanks thrown by Raspian's curious keyboard mapping. You might have skipped over most of the options in raspi-config as I did (the first thing that appears on your screen after all those boot messages finish). Look for "keyboard configuration" and look for the canonical U.S. keyboard choices.
Here's a custom search engine for Raspberry Pi stuff, courtesy of Google.

Friday, September 28, 2012

Fun with the Raspberry Pi

If you've heard about the Raspberry Pi, (wikipedia, elinux.org) a $35 single-board Linux computer, you probably won't learn much new here. The main point of this post is that I got mine to boot, so I do have one or two small bits of advice to pass on to those working toward that goal. First, photographic evidence (veracity: if I were faking it I wouldn't put a big reflected flash in the middle of the screen).

Here's the board booting. Booting (and everything else) is a little slower on the Raspberry Pi than you're probably accustomed to. But then, hey, it's $35, and you can stuff it into whatever piece of hardware you're building and have full-blown Linux with X Windows. So live with it.

My experience has been that at least in the near future, it's not really $35. Here's what happens: the Raspberry Pi folks build a bunch of boards and sell them for $35, but they get picked up by people who want to resell them, so you end up getting yours on eBay for somewhere in the $55 to $70 range. Eventually this mischief will end and the price will stabilize.

 Photographic evidence number two: the board has booted into X Windows. This is using the recommended-for-beginners Debian-based distribution, 2012-09-18-wheezy-raspbian.zip, which unpacks into 2012-09-18-wheezy-raspbian.img, and obviously the date in that name will be updated periodically.

So here are the tips for fellow beginners:
  • First, remember this board is designed for complete novices, and even, heaven help us, artists. Do not despair, you ARE smart enough to get it working.
  • The Raspberry Pi folks warn you away from micro-SD cards, but the one I'm using works fine.
  • You may find that your keyboard is mapped in a funny way. My (@) key and (") key were swapped, and the (#) key was mapped to a British pound sign (£). One solution to this appears here. Mine was to create the file /home/pi/.xsessionrc which contained this line:
setkbmap us -option grp:ctrl_shift_toggle

A better approach to the keyboard issue is one of the options in raspi-config (the first thing that appears on your screen after all those boot messages finish). Look for "keyboard configuration" and select the canonical U.S. keyboard choices.

Everything else seems to be working, but I haven't tried to do much yet. I have no idea how to talk to GPIOs or other peripherals yet, but I've done that with other Linux boards and expect that my past experience will get me there pretty painlessly. That, and there is a HUGE community for this thing.

Looking forward to checking out Adafruit's WebIDE when time permits. The development system runs as a web server on the board, and you develop in the browser on your laptop over a network connection.


And now for your viewing pleasure, assorted Raspberry Pi pr0n:
 

Sunday, September 11, 2011

We need to build more educational computers

When I was a kid, I had this absolutely wonderful educational computer called Digi-Comp. It was very simple, with only three bits of state, and that was fine for learning an awful lot of basic stuff about computers. And it was sturdy as anything. I must have disassembled and reassembled it hundreds of times and it never broke and never stopped working. Somebody needs to design a 21st century mechanical computer using an inexpensive service like Ponoko or Shapeways or 100kGarages or Big Blue Saw to do laser cutting or 3D printing.

When I was in college, I saved up money to buy a KIM-1 single-board computer with a 6502 microprocessor, a hexadecimal keypad, and six seven-segment digit displays. I learned a lot of what became my career playing with that thing, writing little assembly language programs, soldering TTL chips to it, and generally having a great time. When I left school, I bought an old ASR-33 teletype from the school's department for retiring obsolete junk, and used it to give the KIM-1 a 300 baud line printer. Back in those days we had extraordinarily low thresholds of entertainment. Still, it was educational.

We need to be building more of this kind of stuff today. The things we build need to be easily hackable and easy to form user communities around. I guess you could say we already have something like the KIM-1 with today's Arduino, but it never fills me with intrigue like the KIM-1 did, where you were literally typing in machine opcodes onto that hex keypad, and they're showing up in the LED digits. It gives you a real sense of intimacy with the entire process of computation. Compiling C code never gets you quite that close to the action.

If you regard the Digi-Comp and the KIM-1 as two points along a spectrum of sophistication, we probably ought to plan on a third more advanced point, given that the KIM-1 is about 30 years old now. I've been doing some puttering with ARM-7 and ARM-9 boards of various kinds, some so capable as to run Linux, and I think that's a good third point because that's the kind of hardware that appears in modern consumer devices.

Monday, June 13, 2011

Of microcontrollers and operating systems

In recent weeks I've put some effort into working with a Beagleboard running Angstom Linux. The Beagleboard has an OMAP3530 processor, a ridiculously over-powered thing. It's cool to be running Linux on something you can attack with a soldering iron. But as I looked at my intended application and the price of the Beagleboard, and the hoops they jump through to manufacture the Beagleboard, I started to wonder if more conventional weapons might be sufficient to win the day.

I'd blogged in the past about the AT91SAM7, another family of ARM-based chips that are a little less over-powered, so I wondered, would they work for this? My first thought was to use Angstrom Linux on the SAM7. I found that nobody had done it, and digging deeper to find out why they hadn't, I was reminded that Linux requires a MMU and the SAM7 doesn't have one. Neither of these was a surprising piece of information, and I was probably dimly aware of both, but had never consciously connected them.

The reason Linux needs an MMU is because it runs multiple processes in separate memory spaces, so that one process can't crash another by overwriting its memory. This requires remapping from virtual memory addresses to physical addresses. That's most of what an MMU does.

It's shameful to admit, but I had unthinkingly assumed that 32-bit processors would necessarily run something like Linux, merely by virtue of being 32-bit processors. This was the result of having grown up with 8-bit processors and thinking of 32-bit processors as "big" and "complicated" and a little "scary". They are in fact all those things, but we still need to keep our wits in their presence.

Casting about for an operating system that might be more SAM7-friendly, I came across FreeRTOS. I started puttering around with a FreeRTOS port for the SAM7, and after banging on that a while it crossed my mind to think that there might be some other ARM7 chip for which a FreeRTOS port already existed so I wouldn't have to do the port myself. A little investigation in this direction led me to the LPC1768 (overview, datasheet, user's manual, Digikey listing) an inexpensive ARM7 chip with lots of flash and RAM, an Ethernet controller, USB controllers for both host mode and device mode, buckets and buckets of GPIO pins, and a comfortably higher number of MIPS than the SAM7 family. The LPC1768 has an ARM Cortex M3 core (overview, user's guide).

So what are our hardware development options here? Sparkfun provides a 
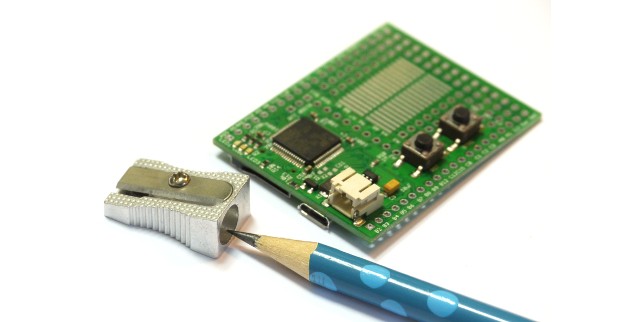
nice little board for only $50. It has tons of pins, sanely spaced at 0.1", and a JTAG connector on one end and a mini-USB on the other. It does require a power supply but that's not unreasonable. It has two pushbuttons (one a reset) and an LED. While I heartily encourage anybody to buy this board, I ended up buying a different board (which, time will tell, I may regret) because it was available on eBay.

I'm hoping to see the board in about a week, and I'll try to get FreeRTOS running on it with reasonable haste. Hopefully it will all work out nicely and I'll get to do a lot of blogging about it. The LPC1768 is really an interesting chip with a lot of on-chip peripherals, and I'd expect that would be a good amount of fun.